Mounting a TV on an RV wall is a great way to make the most of your RV living space. Not only can it provide a great viewing experience, but it can also free up valuable floor space. With the right tools and a few simple steps, you can easily mount a TV in your RV. This article will provide you with a step-by-step guide to help you install your new TV in no time.
Choosing the Right TV
When it comes to choosing the right TV for your RV, there are a few things to consider. First, it’s important to select a model that will fit in the designated space. If you’re unsure of the size of the area available, it’s a good idea to measure the wall before making a purchase. Additionally, if you plan on using the TV outside, you may want to opt for a model that is built to withstand the elements.
Gathering Necessary Supplies
The next step is to gather all the supplies needed for the installation. This includes the TV mount, screws, drill, and any other necessary tools. Additionally, if you plan on wiring the TV, you’ll need to get the appropriate cables. Once you have all the supplies, you’re ready to begin the installation process.
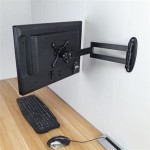
Installing the Mounting Bracket
The first step is to install the mounting bracket. To do this, you’ll need to locate the studs in the wall and mark the area for the bracket. Once you have the area marked, use a drill to screw the bracket into the wall. You may need to use wall anchors if the wall is not strong enough to support the bracket.
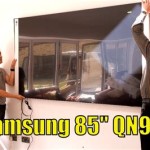
Attaching the TV to the Mount
After the mounting bracket is installed, you’ll need to attach the TV to the mount. To do this, align the mounting holes on the back of the TV with the holes on the mount. Then, use the supplied screws to secure the TV to the mount. Make sure the TV is firmly attached to the mount before proceeding.
Securing the TV to the Wall
Once the TV is attached to the mount, you’ll need to secure it to the wall. To do this, use the supplied screws to secure the mount to the wall. Make sure the screws are tightly secured and that the mount is level before proceeding.
Connecting the TV
The final step is to connect the TV to your RV’s power source. To do this, you’ll need to locate the power cord and plug it into the wall outlet. Once the power is connected, you’ll need to turn on the power switch and turn on the TV. You’re now ready to start watching your favorite shows!
Conclusion
Mounting a TV on an RV wall can be a great way to enhance your RV living experience. With the right tools and a few simple steps, you can easily install a TV in your RV. Just make sure to choose the right TV, gather the necessary supplies, install the mounting bracket, attach the TV to the mount, and secure the TV to the wall. Once you’ve done that, you’ll be ready to start watching your favorite shows.


![Best RV TV Mount [2020] Top Motorhome Reviews](https://i2.wp.com/www.myrvtopreviews.com/wp-content/uploads/2020/05/21-2.jpg)


Related Posts