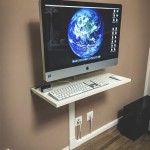
Are you looking to upgrade your workspace by mounting your computer monitor to the wall? This guide will show you how to securely mount a computer monitor to the wall, so you can make the most out of your space. With a few simple steps, you’ll be able to take your workspace to the next level.
Choosing the Right Mount
The first step to mounting a computer monitor to the wall is to choose the right mount. There are a variety of mounts available, from basic wall mounts to more advanced, ergonomic solutions. Consider the size and weight of your monitor, as well as the type of wall you’ll be mounting it to. If you’re mounting to a brick wall, for example, you’ll need a heavy-duty mount to ensure a secure fit. If you’re mounting to drywall, a lighter-duty mount should be sufficient.
Installing the Mount
Once you’ve chosen the right mount, it’s time to install it. Start by determining the location for your monitor. Make sure the location is level and that you’ll have enough clearance to tilt and swivel the monitor as needed. Then, use a stud finder or other tool to locate the wall studs. Use a pencil to mark the locations of the studs.
Next, use a drill to make pilot holes for the mount, following the instructions that came with the mount. Once the pilot holes are made, use the provided screws to securely attach the mount to the wall. Make sure the mount is level before tightening the screws.
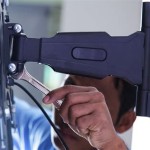
Attaching the Monitor
Once the mount is installed, it’s time to attach the monitor. Start by aligning the mounting holes on the back of the monitor with the mounting brackets on the mount. Then, use the provided screws to secure the monitor to the mount. Make sure the monitor is secure and level before tightening the screws.
Finally, plug in the power and video cables, and you’re ready to go. Enjoy your new, wall-mounted computer monitor!


 (12).jpg)


Related Posts