Installing an iPad Pro wall mount is a great way to provide a secure and convenient way to keep your iPad Pro in place. Whether you use it to display artwork, display information, or just to keep track of your device, an iPad Pro wall mount is a great addition to any home or office. In this article, we will provide step-by-step instructions on how to install an iPad Pro wall mount.
What You’ll Need
Before you begin, you’ll need to gather the necessary materials for the installation. You’ll need:
- An iPad Pro wall mount
- An appropriate drill bit (for wood, plastic or metal)
- Screws, anchors, and wall plugs
- A level
- A screwdriver
Preparing the Wall
Once you have all the necessary materials, the first step is to prepare the wall. Start by finding the optimal position for your wall mount and mark it with a pencil. Then, use the level to make sure the mount is level. Next, check the material of the wall and ensure that you have the correct drill bit. Different materials require different drill bits, so make sure you have the right one. Once you have the correct drill bit, drill the holes for the screws.
Installing the Wall Mount
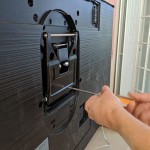
After the holes for the screws have been drilled, it’s time to install the wall mount. Start by inserting the anchors into the holes that you drilled in the wall. Make sure they are firmly in place. Once the anchors are in place, use the screws to attach the wall mount. If you are using plastic anchors, you may need to use a hammer to tap them into place. Once the wall mount is securely in place, you can attach your iPad Pro.
Conclusion
Installing an iPad Pro wall mount is a great way to ensure your device is secure and easily accessible. With the right materials and a bit of patience, you can have your iPad Pro wall mount up and running in no time.


Related Posts