Mounting a monitor on the wall can be a great way to save space and declutter your workspace. Plus, it can give you a better viewing angle and provide better ergonomics. In this article, we’ll show you how to get the job done.
Things You’ll Need
Before you get started, you’ll need to gather the following materials:
- Monitor
- Monitor wall mount
- Screwdriver
- Power drill
- Wall anchors
- Wall screws
Step 1: Choose the Right Wall Mount
The first step to mounting your monitor is to choose the right wall mount. Make sure the mount is compatible with your monitor’s size and weight. Also, make sure the mount is rated for the type of wall you’ll be mounting it on. You should also check to make sure it has all the necessary hardware and instructions.
Step 2: Prepare the Wall
Once you’ve chosen the right wall mount, you’ll need to prepare the wall. Make sure the wall is clean and free of dust and debris. If it’s a drywall, you’ll need to use wall anchors and screws to secure the mount. If it’s a concrete wall, you’ll need to use a power drill and masonry drill bits.
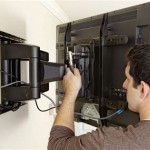
Step 3: Attach the Mount to the Wall
Once the wall is prepped, you can attach the mount. Follow the instructions that came with the mount. Most mounts will require you to use the supplied screws and wall anchors. Use a screwdriver or power drill to secure the mount to the wall.
Step 4: Attach the Monitor to the Mount
Now it’s time to attach the monitor to the mount. Make sure the mount is secure before attempting to attach the monitor. Then, follow the instructions that came with the mount. Most mounts will require you to use the supplied screws. Use a screwdriver to secure the monitor to the mount.
Step 5: Test the Mount
Once the mount is secure and the monitor is attached, it’s time to test it out. Make sure the mount is secured to the wall and the monitor is securely attached to the mount. Then, turn on the monitor and check for any wobbling or instability. If everything looks good, you’re done!


![[DIY] Triple monitor wall mount pcmasterrace](https://i2.wp.com/external-preview.redd.it/ibbCq2tstNLAKlWfJFJyYXZ5wEAXwX6Dv_myI8vRFOI.jpg?auto=webp&s=9b0a79092874db5e7d3bbe84831aab79a8725f8c)


Related Posts