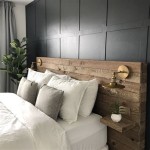
Having a headboard on your bed can add a touch of style and sophistication to any room. With a DIY headboard wall mount, you can easily create a one-of-a-kind headboard that is perfect for your space. This guide will provide you with an easy-to-follow tutorial on how to make a DIY headboard wall mount.
What You Will Need
Before you begin, make sure you have all the necessary supplies. These items include:
- Saw
- Measuring tape
- Screws
- Mounting brackets
- Wooden board
Step-by-Step Instructions
Now that you have all the materials, you can start to make your own headboard wall mount. Follow the steps below for an easy and straightforward process.
- Measure the wall space where you want to mount the headboard. Make sure to leave a few inches of space between the wall and the headboard.
- Cut the wood board to the size of the wall space.
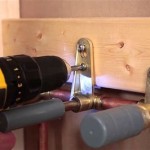
- Attach the mounting brackets to the wall using the screws.
- Place the board on the mounting brackets and secure it in place with more screws.
- Attach the headboard to the board with additional mounting brackets.
Tips for DIY Headboard Wall Mounts
Making your own headboard wall mount is a great way to save money and add a unique touch to your bedroom. Here are a few tips to help you get the best possible results from your DIY project.
- Use a level to make sure the board is attached to the wall correctly.
- Make sure to use the right size screws for the job.
- Be sure to use wood glue for extra stability.
- Paint or stain the board before attaching it to the wall for a more finished look.
Conclusion
Making a DIY headboard wall mount is a great way to add a unique touch to your bedroom. With the right materials and a bit of patience, you can easily create a one-of-a-kind headboard that is perfect for your space. Use the tips and instructions in this guide to make your own DIY headboard wall mount.


Related Posts